Wednesday, August 22, 2012

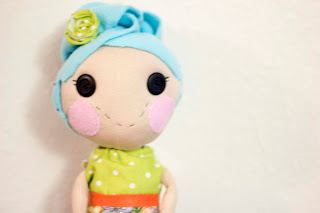
Soft La La Loopsy Inspired Doll

Hey all, it's Jen-with a craft this time!

I'm going cheap-o this Christmas (sorry kiddos!).  We have 3 kids, and another due ON Christmas day.  So, I am busting my butt getting my Christmas shopping/crafting done early.  I plan on having it done by November.  Back to my cheapness, I am planning on making as many presents for my kids as I can.  My 'Crafty Goodness' board on Pinterest is overflowing with ideas.  I was beyond excited when I found the cloth La La Loopsy doll Pin!  My 3.5 year old daughter LOVES her La La Loopsy doll, and everything that has to do with La La Loopsy. But, if you've ever been in contact with a La La Loopsy doll you know that those suckers are hard! One tantrum and Bea Spells A Lot (Soph's doll) could do some serious damage!  So, I set out to try and tackle the softie.

Here is the original Pin
My Froggy Stuff: Shhh... She is Made Out of Socks!
Cute right!?  What crafty person WOULDN'T want to make this!!??

Okay, so here's the deal. The woman who created this doll apparently is an amazing doll maker. She has a website and a Youtube channel full of how to's that have to do with dolls and doll making.  She makes it look easy peasy.  I on the other hand knew it wouldn't be a walk in the park.  I'm doing this as a walk through on her steps.  She posted a video on youtube, so if something doesn't make sense, it's probably covered in the video.

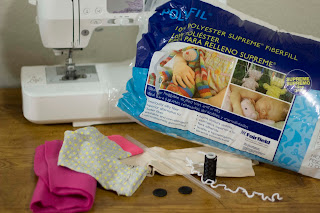
Supplies Needed:
Pair flesh colored socks
Scrap of colored fleece
1 'fun' sock
Black & White thread
Needle
String
Straw (if I could go back I'd use a thin dowel)
2 black buttons
Light pink felt (forgot this in the photo)
Fiberfill
Sewing machine

Step1:
Cut down the back of the heel of the socks and around the toe area. Then cut off the stick out flaps of the heel


Step 2:
Lay socks good side to good side and sew around the edge. In the video she doesn't show it pinned, but I HIGHLY suggest pinning them together.  The socks I used had quite a bit of stretch too them, and if I wouldn't have pinned it together I would have had major issues.

Step 3: 
Along the lower sides sew in arms. In the video she doesn't show that she drew on a guide line for her stitches-I on the other hand did. I was afraid I'd do one too short or something.  After you get your arms sewn in, round out the head and sew in a body.
Step 4:
Cut in between the body/arms to separate the pieces. Then flip them right side out. I used the flat end of a crochet hook to flip the arms right side out..those suckers are skinny!

Step 5:
Turn your fun sock inside out and stitch on some legs. Again, I drew on guide lines, in fear that I'd mess it up.  Cut out your legs and turn them right side out, again, I used the flat end of a crochet hook.

Step 6:
Now comes one of the most difficult parts of the entire process-stuffing. Getting the stuffing in those skinny little legs/arms takes a long time and a long of manipulating.  Stuffing the head/body is a lot easier. Just make sure you make the head nice and round, and don't forget to get your dowel or straw in there to support the doll like a spine.

Step 7:
After it's all stuffed take your string and make a neck-make sure to double knot the string.

Step 8:
Fold in the excess of the sock and sew up the body.  Then sew on the arms and legs. Yes, I am aware mine looks like it had a botched tummy tuck. 

Step 9: 
Attach your pink felt circles for cheeks, then attach your button eyes. The video shows that she glued them, but I sewed mine on.  Then stitch on it's mouth and eye lashes.

Step 10:
Another difficult step-attaching the fleece hair. It took me a LONG time to get it so it didn't look like she had a towel on her head!  I stitched from what would be the back of the head bottom on ear area to bottom of ear area. Then did some stay stitches in the bang/top of the head area.
see-looks like a towel, right!?

Step 11: 
After you're done driving yourself crazy trying to figure out what to do with the hair, make her a pretty little outfit-I don't have photos of me making the outfit, but I just made a mini pillowcase dress and used some felt to tie it off like a belt.  Instead of using ribbon for the neck area, I used elastic.  I also made her a pretty little rolled flower to match.

Step 12:
Get her dress and admire your handy work! Or if you're like me, get her dress, decide you don't like the hair and switch it out completely. :)


Total cost: I only had to purchase the flesh colored socks, which were around $6. Pin It

Wednesday, August 15, 2012

"Easy Homemade French Bread"

Hey everyone, Jen here :)  Yet another Pinterest recipe post. I wasn't going to blog this recipe, but as I was going along, I thought I should document with photos just incase.  Luckily, for me (and you) I did.

Here is the original Pin
EASY Homemade French Bread for about $0.25 a loaf- make 4 loaves in an hour

The Pin promised four loaves of french bread for $1.00 in about an hour. Perfect!  I LOVE fresh bread, so making my own in under an hour would be amazing!  My younger two were napping, and I had (at least) an hour to spare!  So I head to the cabinets and get all the paraphernalia together to get this yumminess going.

Ingredients:
2 1/2c warm water
2 tbs yeast
2 tbs sugar
2 tbs white vinegar
1 tbs salt
1/3c oil
6-7c flour (or more if it's too soft)

That was the ingredients list from the blog that the pin links too.  Okay, here's the problem.  What she doesn't say until you read the comments under the post on her blog that you need to use INSTANT YEAST. I unknowingly got Active Yeast.  I didn't know that until I was half way into the recipe. Thought I'd put that out there..umm..NOW. *Pet Peeve* If you're going to write a recipe out on the internet for others to use, maybe you should consider putting in all the knitty gritty details...just sayin'. Anyway..

Here's my steps in photo/caption form. :)

My ingredients.  I used olive oil (orange container), it's what I normally cook with.  You can use any oil I presume..

Step 1
Combine warm water, yeast (INSTANT), sugar and white vinegar into your mixing bowl.  Now this kind of confused me. Maybe I'm an idiot..but I didn't know if I was supposed to mix it up, or just combine the ingredients in the bowl...I ended up mixing them.  Anyway, you wait for the mixture to start bubbling (claimed to be 3-5m wait)
this photograph is from before I actually mixed it up

Step 2
Add salt, oil and flour, one cup at a time while mixing.  Okay..sounds good...recipe calls for 5-6 cups..umm..mine was still really sticky/soft at 6c..So I ended up adding more like 7 cups.
This was after just the 6 cups..wayyy to soft

Step 3
Kneed dough for 3-5 minutes. Honestly, this was one of the most difficult steps. Maybe my dough was still too soft? But I made a GIANT mess of my hands and called it good after 2 minutes or so.  After you kneed the dough the recipe calls for you to put the dough (in the bowl) in the oven (I presume the oven is off, because it doesn't say otherwise) with a sauce pot of boiling water.  Apparently, the dough should rise and you should punch it back down when this happens.  It should be in there for 3-5m.  Yeah, that didn't happen.  I put it in the oven with the water for close to 10m and it didn't look like it rose at all.  

Step 4
Form into loaves and place on a greased cookie sheet sprinkled with cornmeal.  I, who like most read an ingredients list and make sure I have those items on hand when attempting a recipe, was unaware that there was cornmeal needed for this recipe (because it WASN'T on the ingredients list!).  So I just sprinkled flour over the greased cookie sheet and called it good.  Once you get your loaves formed cut 3-5 slits on top and cover with some egg wash (a beated egg-which lucky for me I have eggs on hand 24/7, because again, it wasn't on the ingredients list).

Step 5
Put the pan in the oven set at 170 and let the dough rise.  Once it's risen enough just turn the oven up to 375 and let it cook.  The actual recipe didn't really give a time it just said until it was done. Ohhhkayyy...  Mine was in the oven for approximately 20m.
I honestly didn't know if the yeast was going to work because I wasn't sure if I jacked up the recipe-but it rose, and it worked!

And here it is 20 minutes later. :) 

Verdict: eh. It's okay.  The kids really like it. I think I'm more of a yeast bread person.  It's a fairly easy recipe, and it took closer to 2 hours start to finish..but I was also stopping to take photographs through out the way. OH and I want to add-I got 2 decent sized loaves out of the recipe.  If you tried for 4 (like the pin promised), they'd be pretty small.

Total Cost: pennies.  I had everything but the yeast on hand.  The whole jar of yeast cost me $3, and I only used 2 tablespoons.  

Pin It

Friday, August 10, 2012

Recovering a Cell Phone Cover

Hey everyone, Jen here!  I'm sure there's MANY of you out there, like me, who have pinned a bunch of cute (probably expensive) cell phone covers on Pinterest.  Here's the deal, I'm cheap.  I refuse to spend over $10 on a cellphone case. When I was up in Michigan, I hit up TJ Maxx and they happened to have a cell phone cover on clearance for $2. Perfect!  Unfortunately, it looked like something a 12-15 year old would have on their phones, not an almost 30 year old mother of 3 (soon to be 4).  So I got to work on recovering it.

I don't really have a singular inspirational Pin for this project, but I do have 4-5 covers Pinned.

Here's what you'll need:
-Mod Podge-I don't think it really matters if you use matte or gloss finish.  I used matte for attaching the fabric and gloss for a top coat.
-Scissors, I also ended up using pinking shears to cut out the camera hole area
-Sponge brush
-Fabric of choice ( I LOVE this bird fabric, I bought it years ago at Joanne's and have been hoarding it)
-Cell phone cover

Step 1: Coat the cover in Mod Podge

Step 2: Lay on your fabric and smooth it out, making sure to not get any bubbles or wrinkles.  Do the back first, then work on the sides

Step 3:  Let dry, then trim you fabric. Hindsight being 20/20, make sure you don't trim it too short to cover the front.  I trimmed mine a little too short and some of the hot pink showed through. Once fabric is trimmed use more Mod Podge and work the edges down. This might take a little bit, and a few applications to get the fabric to lay flat, and stay there.

Step 4: Once you get all of your edges down, and it's dry, cut out the camera hole.  I forgot to do this until the end, so I don't have a photo of this step.  After you get your camera hole cut out, cover all of the fabric in a layer of Mod Podge (this is where I used gloss).  If you're feeling really fancy, you can mix in some glitter with this layer of Mod Podge..not my style, but just saying. :)

Step 5: Let it dry, then put it on your phone. :) Done!
Here is my new phone cover on my phone. 


Total Project Cost: $2.00. I already had everything else. :)


Pin It