There are sooo many things that I like and pin- but one of my faves is chalkboard paint. It seems so forgiving since it has a grittier texture than regular paint, so I thought it would be a good place to start. This is the pin that inspired me:

I got lucky because not long after I saw it, my mom offered me this mirror:

Not the best picture, but you get the... picture. Anyway, I've always loved this mirror, but the glass in it was realllllly old, and I'm not into that look. So, I went out and bought some chalkboard paint- I think I paid around $15 for the paint, but I've completed several projects with it so far. Then I looked for paint chips in a color I liked and I bought two of the sample shades you can take home. Those were around $6 together. So let's say I have $9 invested in this project.
The first thing I did was I removed the mirror from the frame. Pretend like there is a picture of this process. It should look something like this:
Me struggling to remove staples circa the year my mother was born, resulting in a small amount of bloodshed.
Once I got the mirror out, I was going to measure,etc., and have a piece of wood cut to fit the frame. The back of the frame was actually a piece of wood though, so I decided that I would just paint it instead. Pretend like you are now viewing pics of me painting the wood with chalkboard paint. About 3 coats. I used a sponge roller and that made it super easy, and super quick.
Next, I started painting the frame with the paint samples that I purchased. I used foam yet again. I just really think it makes painting so much easier, especially when you have zero patience like I do. As a matter of fact, I have so little patience that I decided not to waste time removing the old white paint, or priming it. If you are a person who needs things to be perfect, then I'd suggest not bypassing those steps like I did. If you are lazy like me though, priming is not necessary :). Again I used two or three coats of paint to get the level of coverage that I wanted.
Once everything was painted and dried, I dug around in my parents garage for some small nails and I just hammered the chalkboard into the frame. Thank God I'm not building bridges. Because I was lazy and skipped some steps in the painting process, I decided to "distress" it, which basically consisted of beating around on it with a hammer, and voila!
This is what I ended up with:
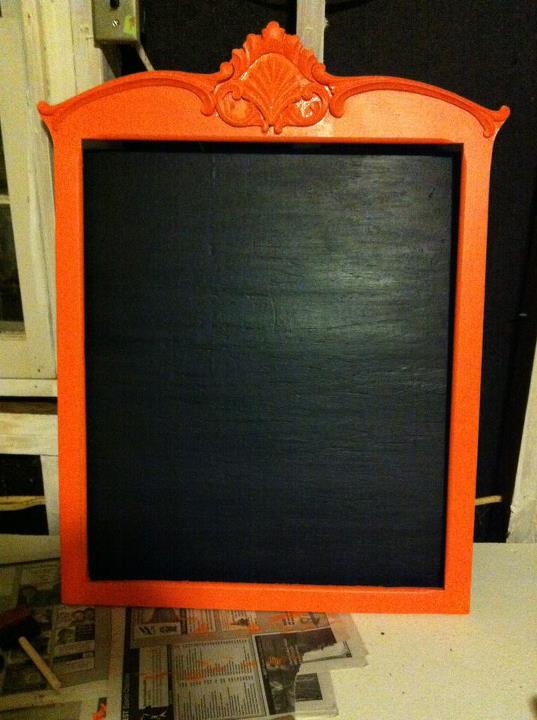
I chose orange like the actual pin because it's what worked for me, but I would love it in any color! This is what it looks like in my house now:

I also refinished the cabinet below it, which should have doors. If you know how to reattach said doors, feel free to come by. It's also attached to the wall with some heavy duty velcro, because the old hanger was just a piece of wire and I cut that off.
Not bad for a beginner!
LA
Pin It
No comments:
Post a Comment